WRITING CONTEST!
Don’t miss out!

Great prizes and each entry gets a critique from ME!
Details and entry info HERE
HURRY! Entry deadline is March 31, 2018
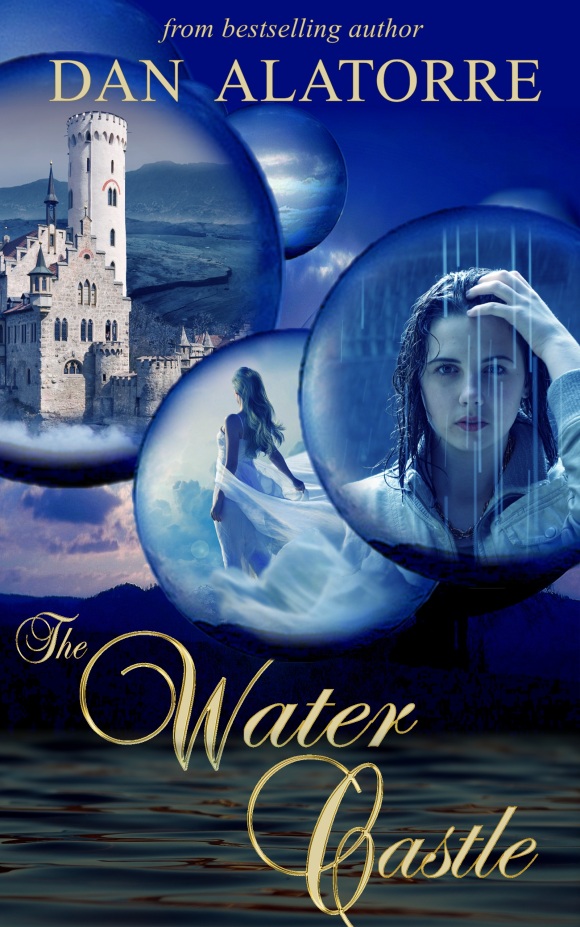

Occasionally, I try to make a book cover for an upcoming work.
(That sucker above looks amazing.)
Sometimes I do it to give the cover designer an idea of what I’m looking for; sometimes I just wanna see if I can do it.
Us creative types are like that.
USUALLY AUTHORS CAN’T DO THEIR OWN COVERS
(And shouldn’t!)
Fair warning. What we think they look like usually isn’t as good as what they really look like, and isn’t as professional as what they SHOULD look like.
Okay, disclaimers over. Let’s make a book cover!
I won’t pretend that the cover above only took me 10 minutes to do. The first – the first version of it, let’s say – took me a few hours. But a few weeks ago I developed a kind of template for the covers I’d been doing for my Young Authors Club kids, and I could knock out a simple cover for them in a few minutes:


Not bad, right?
And – see the template?
- A simple, single image that takes MOST of the cover, then
- drop in a title that’s in an appropriate font and color.
Done.
And most of them look pretty good! The Bells Of London is beautiful.
There’s your 2 steps. You’re welcome.
Now, for The Water Castle cover, above, I probably made 10 versions of that (okay 20), so it took a few hours. Okay, it was 30 versions.
But I learned.
I was getting an education, so it was worth a little time.
I use Roxio to make covers, but I bought Photoshop, and over the next few weeks I’ll learn how to do stuff with it. (Roxio used to be a pretty good competitor for Photoshop
But at some point you have to go with what everybody does, and Photoshop is number one right now.)

To make that cover, I did the following
I searched for castles and modern day girls.
Good looking but not too pretty, because the MC considered herself plain – and
definitely not model pretty.
I looked at lots of girls on free image sites. LOTS. Hundreds.
It sounds silly, but there are two things at work. First of all, yeah I believe if the cover girl is too pretty, that starts to be a turn off for the buyer – typically a woman aged 35-55. A too-beautiful cover model can look not realistic enough to the average reader. Second, if she’s not attractive enough, it’s visually unappealing. She still needs to be someone we can cheer for, maybe look up to, and possibly idealize in some ways. I don’t have any hard facts for that but that’s just what I think.
So she needed to be average but good looking. Models aren’t usually average looking, so that was harder than I expected.


She also needed to give the appearance of being smart, if at all possible, because we are marketing this book primarily to women and I just don’t think a bunch of women want to read a story about somebody who looks like a moron.
To the interwebs!
So I went to websites that offer free pictures and I literally looked at hundreds. From there I chose maybe 30 to give a second look at.
- Any girl who seemed to be about the right age and
- had an expression on her face that somehow might relate to the story.
- Not smiling, but scared or concerned or wistful or thinking or distraught.
From there I narrowed it down to three or four because sometimes what you see in a big picture, once it’s cropped… it doesn’t look that way anymore.
She may look wistful in a big picture walking through a field, and when you crop it she looks bitchy. That’s what happened with one of these images!
Same process for the castle.
The castle in the story had a big, round tower. It was pretty easy to find lots of cool castles, but not as easy to find one that had a tower I liked. And then you want to put these two images, the tower and the girl, together in such a way that it makes sense and doesn’t look like somebody Photoshopped it in five minutes.


But what I learned from doing covers for my Young Authors Club was this: one image is better than lots of images cut and pasted together.

That picture says fantasy romance to me. It would look professional on a cover.
And it was free.
Whaaattt???
I know!
Artists probably have do the same thing as writers. We all know lots and lots of authors who are trying to throw free books at people to gain an audience. I believe artists are instructed to do the same thing. If you have hundreds of pieces of art that no one is seeing, what is the harm in listing a few on a free website that gets them exposure?
When I want another cover I am much more inclined to go to somebody who has already made a picture I like. As a result,
there is a lot of high-quality artwork out there that you would never think was FREE.
The Young Authors Club covers all contain a common template, too. The image I selected is appropriate for the genre and it takes up almost the entire cover space.
I find a sci fi font or romance font or playful font by typing the title in a Word document, highlighting it (selecting it) and scrolling through the fonts in the dropdown box. Done properly, Word changes my title into each font as I scroll. It’s fast and effective, and when I find one I like, I see what it is and type it into my image manipulation software (Roxio or Photoshop).
(As I do this, I make a note: X looks good for fantasy. Y works for drama, etc.
No sense in reinventing the wheel on my next cover.)
Then I make it the right color. Usually that’s best done by selecting a color already appearing in the image. Easy peasy.
If something is too big or too small, my friends can usually tell me that, so I share my covers privately with a couple of people. But after a while you start to get the hang of it.
So,
After looking at dozens of girls and dozens of castles and dozens of other things…


")


Because like all authors, we can’t write a blurb because we can’t condense our 80,000 word story into a 100 word summary, and we do the same d@mned thing with covers.
Any image that looks interesting to us, we grab it.
Which is fine, as long as we narrow it down later. Simpler is better.

That image grabbed my eye.
I thought, hey – I could use an image like that, put the MC in one planet “bubble” and the castle in another one… Because I wanted ONE image, if possible.
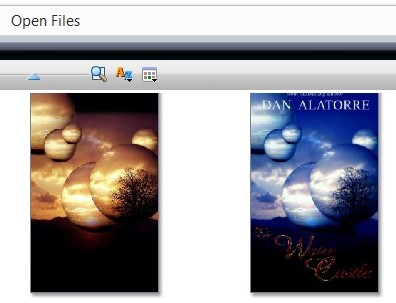
The first step was to make the brown image blue. That’s an easy tint adjustment.
Then I cut out my castle and girl and stuff, and dropped them onto the cover… blurred the edges (edge fading in Roxio)…


This is where the fun really starts. Overalls girl bigger or smaller? Flowing robe girl closer or farther away?
Have her look left? Or is right better?
And while we’re messing with what girl to put where, let’s try different fonts!


I tend to think that any font you can use in Microsoft Word will tend to look pretty plain on your book cover. That’s fine for “The Hitman” because the font I used there, while available in Word, also is not used very often on stuff, but still works fine for that cover. It’s a short title and the big letters look good.
On some of the other ones I did for Young Authors, there were certain fonts that just looked better with certain genres. For my fantasy romance, something flowery and script-oriented I thought would look best.


Don’t be fooled; a lot of the free image sites also have free images of pretty letters! Gold letters. Flowery letters. Letters that look like they’re made of wood. You name it.
What I did was type my title in a regular font that was as close to the flowery one I liked, and then carefully over laid the “pictures” of letters over the type ones.


Which would look best?
Try them all!
See that line in the one sample, above? That’s so my letters are spaced properly and even. When you’re laying in individual letters one at a time, they can be all over the place like chicken noodle soup. You don’t want that.


Alphabet soup, I guess.
But those images are what your working with. One letter at a time. (It’s tedious, and that’s ultimately NOT what I went with for TWC.)
Then, when you drop the letters on to your cover – they don’t always look good! They looked fine on the white background but not on your castle background.
As much as I liked some of those fonts “on paper,” they didn’t look as good once they made their way over to the cover.

But that one did!
And even though I really wanted something sparkly here, this one looks best.
Now, a few more tweaks. I decided on a different girl and I decided to trade the “bubbles” around so the girl with the flying robes was a little smaller and the modern day main character model was a little bigger – but I had some black space at the bottom.
Hmm…
Well, the story is called The Water Castle, so…

I added that
See?


(Click on the image to enlarge it.)
I dropped the image of the water over the black space using a “transparency” filter to make it less severe.
In other words, I made it not quite so drastic of an image, but more see-through, so it wouldn’t interfere too much with my title font.
Now it’s just a matter of deciding which girl will be in the big bubble representing my main character…


Fourteen year old Gina and lives in modern Tampa, but accidentally discovers a portal that takes her to the 1700’s where she meets and falls for a young Spanish Noble tasked with settling La Florida. Each day she goes to school, then sneaks off to the portal to spend time in the old world with Prince Philip. But as she studies history in school, she sees her textbook change each day to reflect things she did in old Florida – possibly sending the modern world onto a new path and rewriting history for the prince! As her fondness for Philip intensifies, native tribes rise up to demolish the Spanish settlement – and Gina realizes she must choose between staying in the modern world or living in the past.
Which girl do you like best?
Finally, I put the author name in a color that already appears in the picture. In this one, it would have been blue – but since I really thought the gold lettering in the title looked good against the dark cover, and since this is a fantasy, the script gold stuff looks good.
I used a gold color for my name, but not any special font. I didn’t go track down images of each letter so it looked like metal, I just wanted the gold color.
Those three images are our finalists.
DECISION TIME?
There were two other images made by a cover designer. If I post these three pictures along with those two here, on Facebook, and on the blog, a funny thing will happen.
As soon as I get close to 20 votes, a clear winner will emerge. Sometimes that’ll happen after as few as twelve votes. And if we get 100 votes or more, the one in the lead after twelve almost never changes.
Usually that’s the best cover to go with. Let the fans decide. Crowdsourcing. Whatever you wanna call it.
Now, remember – I said to find a simple image and let it be the whole cover. I didn’t follow that advice here, but if you are starting out, that’s the way to go. As you practice, you’ll get better. As you show mock-ups to friends, you’ll get better.
Weigh the time spent making a cover versus hiring a designer, because you can get good covers for under $50 – and your time may be better spent writing.
On the other hand, this cover designing stuff is fun, and fun should be part of the process.

5 replies on “How to make a book cover in 2 easy steps (or 200 not so easy steps). Follow along and watch the magic happen. Probably.”
Reblogged this on When Angels Fly.
LikeLiked by 1 person
Cool! Thanks.
LikeLiked by 1 person
Welcome!
LikeLiked by 1 person
Number 2. Your blurb talks about her attending school and she looks more like a school girl. But all three are awesome.
LikeLiked by 1 person
Aww…
*blushes*
* silently pumps fist when no one is looking. *
LikeLiked by 1 person